This tutorial is licensed under CC-BY-SA - feel free to share and modify it (but keep information free)!
 This tutorial was originally written for the first Seafile forum of Seafile GmbH. Since the announcement to fork Seafile by Seafile GmbH I’ve decided to move my tutorials to the new Seafile forum of the original developers of Seafile (so this one).
This tutorial version is the maintained one.
Tutorial for a complete certificate chain with your own Certificate Authority (CA)
(This tutorial is an add-on for Tutorial for Seafile CE + Nginx + dynamic DNS (on ARM / Cubietruck / RaspberryPi))
Recently there was a nice tutorial for creating a complete own certificate chain for Nginx in computer magazine c’t 23/2015 ( http://www.heise.de/ct/ausgabe/2015-23-Den-Webserver-Nginx-fuer-HTTPS-einrichten-2842005.html ). I followed the tutorial and I’m happy to share my notes.
Important: reasons for and problems of a full certificate chain
You have to import your.server.tld-root-CA.crt (the so called “root certificate”) to every client you want to sync with your Seafile server otherwise file synchronisation via Seafile client will not work. Yes, Seafile client offers the option Settings / Advanced / “Do not verify server ertificate in HTTPS syncing” to disable the certificate verification but the goal of a full certificate chain is to enabling a secure certificate verification between client to server.
If you activate “Do not verify server ertificate in HTTPS syncing” this can will a major security problem!
So again: use “Do not verify server ertificate in HTTPS syncing” only to test if the file synchronisation works in general but never for productive use.
The problem of an own full certificate chain is that some people reported that it can be difficult to import your.server.tld-root-CA.crt in Windows and MacOS clients. I only use Linux clients and never had problems but anyway if you have problems with this under Windows or MacOS: “Do not verify server ertificate in HTTPS syncing” is not a solution!
Alternatives for this tutorial
Let’s Encrypt can be an alternative as mentioned by @germeier At the time of creating this tutorial Let’s encrypt was not working out of the box with Nginx.
@hambier provided a tutorial for using Let’s Encrypt: Tutorial for using free SSL/TLS certificates provided by “letsencrypt” - try this if you don’t want to go for an own certificate chain (so if you don’t want to install your root certificate on every client which wants to connect via Seafile client with your Seafile server).
Ways to get the a complete certificate chain
If you understoof my notes above (“Important: reasons for and problems of a full certificate chain”) and want to give the full certificate chain a try there are two ways for you: a short way descibed under the later following headline “short way” is using a script which does everything the “long way” is describing under “long way”.
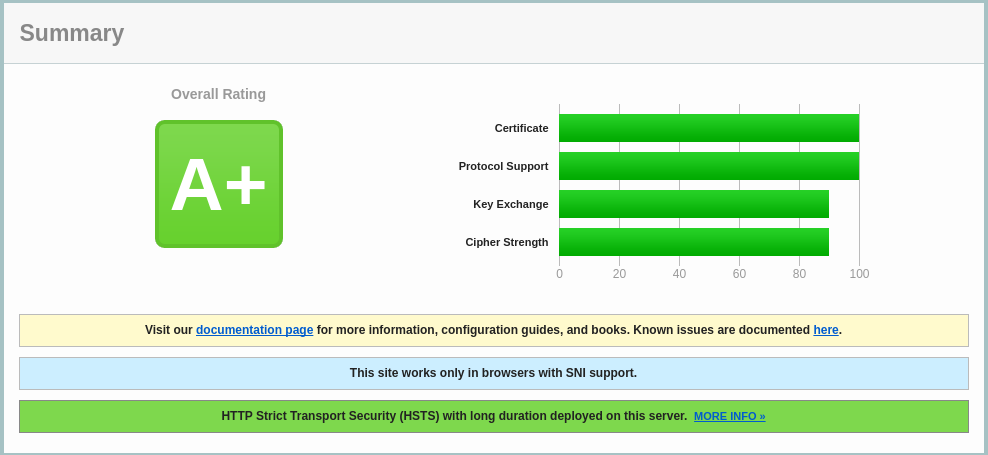
(Just if you are interested: the created certificates have the following quality checking with https://www.ssllabs.com/ssltest/:
Overall Rating
T
If trust issues are ignored:
A

This server supports TLS_FALLBACK_SCSV to prevent protocol downgrade attacks.
This server supports HTTP Strict Transport Security with long duration.

Configuration

Protocols
TLS 1.2 Yes
TLS 1.1 Yes
TLS 1.0 Yes
SSL 3 No
SSL 2 No

Cipher Suites (SSL 3+ suites in server-preferred order; deprecated and SSL 2 suites at the end)
TLS_ECDHE_RSA_WITH_AES_256_GCM_SHA384 (0xc030) ECDH secp256r1 (eq. 3072 bits RSA) FS 256
TLS_ECDHE_RSA_WITH_AES_256_CBC_SHA384 (0xc028) ECDH secp256r1 (eq. 3072 bits RSA) FS 256
TLS_ECDHE_RSA_WITH_AES_256_CBC_SHA (0xc014) ECDH secp256r1 (eq. 3072 bits RSA) FS 256
TLS_ECDHE_RSA_WITH_AES_128_GCM_SHA256 (0xc02f) ECDH secp256r1 (eq. 3072 bits RSA) FS 128
TLS_ECDHE_RSA_WITH_AES_128_CBC_SHA256 (0xc027) ECDH secp256r1 (eq. 3072 bits RSA) FS 128
TLS_ECDHE_RSA_WITH_AES_128_CBC_SHA (0xc013) ECDH secp256r1 (eq. 3072 bits RSA) FS 128
TLS_DHE_RSA_WITH_AES_256_GCM_SHA384 (0x9f) DH 4096 bits FS 256
TLS_DHE_RSA_WITH_AES_256_CBC_SHA256 (0x6b) DH 4096 bits FS 256
TLS_DHE_RSA_WITH_AES_256_CBC_SHA (0x39) DH 4096 bits FS 256
TLS_DHE_RSA_WITH_AES_128_GCM_SHA256 (0x9e) DH 4096 bits FS 128
TLS_DHE_RSA_WITH_AES_128_CBC_SHA256 (0x67) DH 4096 bits FS 128
11.01.2016 09:38SSL Server Test: my.ddns.net (Powered by Qualys SSL Labs)
https://www.ssllabs.com/ssltest/analyze.html?d=my.ddns.net&hideRes...
Cipher Suites (SSL 3+ suites in server-preferred order; deprecated and SSL 2 suites at the end)
TLS_DHE_RSA_WITH_AES_128_CBC_SHA (0x33) DH 4096 bits FS
128
[...]
(I had to shorten the output because of forum restrictions)
KEY/PEM/CSR/WTF???
To understand the certificate file formats I recommend to read:
SHORT WAY
Do all the following steps of the “short way” ON YOUR CLIENT.
The computer magazine c’t provides a script which does all the following steps: “Python Skript zum Erstellen einer Self-Signed-Zertifikatskette”: http://www.heise.de/ct/ausgabe/2015-23-Den-Webserver-Nginx-fuer-HTTPS-einrichten-2842005.html#zsdb-article-links
The official github repository of the certificate chain creator should offer you https://github.com/pinae/certificate-chain-creator/archive/master.zip for the latest version. Download the zip file and extract “certchaincreator.py” to a folder called “my full certificate chain” (or whatever you like).
“certchaincreator.py” creates all certificates and a certificate chain in less than 1 minute. The usage is:
chmod +x certchaincreator.py
./certchaincreator.py -s 4096 -d 364 --country US --state YourState --locality YourCity --company-name example-company --organizational-unit example-company-ca --email example@provider.org --ca-password LONGPASSWORD1 --intermediate-password LONGPASSWORD2 YourDomain.tld(withoutWWW, example :your.ddns.net)
The script I was using for my certificate chain is the following one (check the official link above at first and for the case the downloaded script does not work copy&paste the following code in a text file and save it as certchaincreator.py):
#!/usr/bin/python3
# -*- coding: utf-8 -*-

import os
import re
import argparse
import getpass


def prepare_config(dns_names=[]):
    with open("/etc/ssl/openssl.cnf", 'r') as openssl_config:
        config = openssl_config.read()
    lines = config.splitlines()
    req_regex = re.compile('\s*\[\s*req\s*\]\s*')
    for number, line in enumerate(lines):
        if re.search(req_regex, line):
            lines.insert(number + 1, "req_extensions = v3_req")
            break
    v3req_regex = re.compile('\s*\[\s*v3_req\s*\]\s*')
    next_block_regex = re.compile('\s*\[\s*\w+\s*\]\s*')
    v3req_found = False
    for number, line in enumerate(lines):
        if v3req_found and re.search(next_block_regex, line) and len(dns_names) > 0:
            lines.insert(number, "subjectAltName = @alt_names")
            lines.insert(number + 1, "")
            lines.insert(number + 2, "[alt_names]")
            for name_no, name in enumerate(dns_names):
                lines.insert(number + 3 + name_no, "DNS." + str(name_no + 1) + " = " + name)
            lines.insert(number + 3 + len(dns_names), "")
            break
        if re.search(v3req_regex, line):
            v3req_found = True
    v3_ca_regex = re.compile('\s*\[\s*v3_ca\s*\]\s*')
    v3_ca_found = False
    for number, line in enumerate(lines):
        if v3_ca_found and re.search(next_block_regex, line) and len(dns_names) > 0:
            lines.insert(number, "subjectAltName = @alt_names")
            lines.insert(number + 1, "")
            lines.insert(number + 2, "[ v3_ca_has_san ]")
            lines.insert(number + 3, "subjectKeyIdentifier = hash")
            lines.insert(number + 4, "authorityKeyIdentifier = keyid:always,issuer:always")
            lines.insert(number + 5, "basicConstraints = CA:true")
            lines.insert(number + 6, "")
            break
        if re.search(v3_ca_regex, line):
            v3_ca_found = True
    with open("demoCA/openssl.cnf", 'w') as local_file:
        local_file.write("\n".join(lines) + "\n")


def create_certificate_chain():
    os.system("mkdir demoCA/newcerts")
    os.system("touch demoCA/index.txt")
    os.system("echo 1000 > demoCA/serial")
    os.system("openssl genrsa -aes256 -out CA.key -passout pass:" + ca_password + " " + str(key_size) + "")
    locality_option = ""
    if args.locality and len(args.locality) > 0:
        locality_option = "/L=" + args.locality
    organizational_unit_option = ""
    if args.organizational_unit and len(args.organizational_unit) > 0:
        organizational_unit_option = "/OU=" + args.organizational_unit
    email_option = ""
    if args.email and len(args.email) > 0:
        email_option = "/emailAddress=" + args.email
    os.system("openssl req -config " + os.path.abspath("demoCA/openssl.cnf") + " -x509 -new -nodes " +
              "-extensions v3_ca_has_san -utf8 " +
              "-key CA.key -passin pass:" + ca_password + " " +
              "-subj \"/C=" + country + "/ST=" + state + locality_option +
              "/O=" + company_name + organizational_unit_option + "/CN=" + args.domain + "-CA-root" +
              email_option + "\" " +
              "-days " + str(days) + " " +
              "-out CA.pem -sha512")
    os.system("openssl genrsa -aes256 -out intermediate.key -passout pass:" + intermediate_password + " " +
              str(key_size))
    os.system("openssl req -config " + os.path.abspath("demoCA/openssl.cnf") + " " +
              "-sha256 -new -utf8 -key intermediate.key " +
              "-passin pass:" + intermediate_password + " " +
              "-subj \"/C=" + country + "/ST=" + state + locality_option +
              "/O=" + company_name + organizational_unit_option + "/CN=" + args.domain + "-CA-intermediate" +
              email_option + "\" " +
              "-out intermediate.csr")
    os.system("openssl ca -config " + os.path.abspath("demoCA/openssl.cnf") + " " +
              "-keyfile CA.key -cert CA.pem -extensions v3_ca -notext -md sha256 -batch " +
              "-passin pass:" + ca_password + " -in intermediate.csr -out intermediate.pem")
    os.system("openssl verify -CAfile CA.pem intermediate.pem")
    os.system("openssl genrsa -aes256 -out server.key -passout pass:1234 " + str(key_size))
    os.system("openssl req -config " + os.path.abspath("demoCA/openssl.cnf") + " -sha256 -new -utf8 " +
              "-key server.key -passin pass:1234 -subj \"/C=" + country + "/ST=" + state + locality_option +
              "/O=" + company_name + organizational_unit_option + "/CN=" + args.domain + email_option + "\" " +
              "-out server.csr")
    os.system("mv server.key server.key.orig")
    os.system("openssl rsa -in server.key.orig -out server.key -passin pass:1234")
    os.system("rm server.key.orig")
    os.system("openssl ca -config " + os.path.abspath("demoCA/openssl.cnf") + " " +
              "-keyfile intermediate.key -passin pass:" + intermediate_password + " " +
              "-cert intermediate.pem -extensions v3_ca -notext -md sha256 -batch " +
              "-days " + str(days) + " -in server.csr -out server.pem")
    os.system("cat server.pem intermediate.pem CA.pem > chain.pem")


if __name__ == "__main__":
    parser = argparse.ArgumentParser(description="Generate a certificate chain.")
    parser.add_argument('domain', help="Domain name without www.")
    parser.add_argument('-s', '--key-size',
                        type=int,
                        help="Size of the key in bits. 2048 bit is quite common. " +
                             "4096 bit is more secure and the default.")
    parser.add_argument('-d', '--days',
                        type=int,
                        help="Validity time in days. Default is 2492 (7 years).")
    parser.add_argument('--country',
                        type=str,
                        help="Country code with two letters. Default is DE.")
    parser.add_argument('--state',
                        type=str,
                        help="State or region. Default is \"Some-State\".")
    parser.add_argument('--locality',
                        type=str,
                        help="City or place.")
    parser.add_argument('--company-name',
                        type=str,
                        help="Company name. Default is the domain.")
    parser.add_argument('--organizational-unit',
                        type=str,
                        help="Name of your unit or team.")
    parser.add_argument('--email',
                        type=str,
                        help="Email.")
    parser.add_argument('--ca-password',
                        type=str,
                        help="CA key password. If omitted it will be prompted.")
    parser.add_argument('--intermediate-password',
                        type=str,
                        help="intermediate key password. If omitted it will be prompted.")
    args = parser.parse_args()
    if args.key_size:
        key_size = args.key_size
    else:
        key_size = 4096
    if args.days:
        days = args.days
    else:
        days = 2492
    if args.country:
        country = str.capitalize(args.country[:2])
    else:
        country = "DE"
    if args.state:
        state = args.state
    else:
        state = "Some-State"
    if args.company_name:
        company_name = args.company_name
    else:
        company_name = args.domain
    os.system("mkdir demoCA")
    prepare_config([args.domain, "www." + args.domain])
    if args.ca_password:
        ca_password = args.ca_password
    else:
        ca_password = getpass.getpass("Enter pass phrase for CA.key: ")
    if args.intermediate_password:
        intermediate_password = args.intermediate_password
    else:
        intermediate_password = getpass.getpass("Enter pass phrase for intermediate.key: ")
    create_certificate_chain()
    #os.system("rm demoCA/openssl.cnf")
After you created the certificates via script go on with step “5) adjust Nginx settings and provide certificate chain for Nginx [on your server]” under “long way”.
LONG WAY
If you want to create the chain step by step here are the steps (I did it this way):
overview:
- prepare CA [on your client pc]
- → generate root-CA.pem (root-CA-certificate) [on your client pc]
- → generate intermediate.pem (intermediate-CA-certificate) [on your client pc]
4)-> generate your.server.tld.pem (server-certificate) [on your client pc] - adjust Nginx settings and provide certificate chain for Nginx [on your server]
- some entrys for configuration files in the following steps are
in [ squared brackets ] so you have to copy and paste them as well - prepare something to generate and save several long/strong passwords
1) prepare CA
ON YOUR CLIENT, not your server create the following directory and files:
mkdir -p /home/yourUser/myCA/demoCA/newcerts
the folder name “demoCA” is used by openssl.cnf, using the same name we don’t need to edit the path for demoCA in openssl.cnf later
touch /home/yourUser/myCA/demoCA/index.txt
echo 1000 > /home/yourUser/myCA/demoCA/serial
cd /home/yourUser/myCA/
cp /etc/ssl/openssl.cnf .
edit openssl.cnf, in section [ v3_req ] add the lines:
subjectAltName = @alt_names
[ alt_names ]
define domain name of your certificate in section [ alt_names ] with the entry:
DNS.1 = your.server.tld
FOR THE CASE you want to add more Domains add:
DNS.2 = your.server2.tld
EXAMPLE:
[ v3_req ]

# Extensions to add to a certificate request

basicConstraints = CA:FALSE
keyUsage = nonRepudiation, digitalSignature, keyEncipherment

subjectAltName = @alt_names

[alt_names]
DNS.1 = example.ddns.net
DNS.2 = www.example.ddns.net
in section [ v3_ca ] add the entries before the line [ crl_ext ]:
subjectAltName = @alt_names
[ v3_ca_has_san ]
subjectKeyIdentifier = hash
authorityKeyIdentifier = keyid:always,issuer:always
basicConstraints = CA:true
2) generate root-CA.pem (root-CA-certificate)
ON YOUR CLIENT, not your server:
openssl genrsa -aes256 -out root-CA.key 4096
openssl req -config openssl.cnf -x509 -new -nodes -extensions v3_ca_has_san -utf8 -key root-CA.key -days 2492 -out root-CA.pem -sha512
You are about to be asked to enter information that will be incorporated into your certificate request, EXAMPLE:
Country Name (2 letter code) [AU]:US
State or Province Name (full name) [Some-State]:Simpson's State
Locality Name (eg, city) []:Springfield
Organization Name (eg, company) [Internet Widgits Pty Ltd]:FantasyName
Organizational Unit Name (eg, section) []:FantasyName-CA
Common Name (e.g. server FQDN or YOUR name) []:FantasyName-root-CA
Email Address []:address@emailprovider.com
important is that you use the same “FantasyName” for 1) “Organization Name” and the same
“FantasyName-CA” for 2) “Organizational Unit Name” for the following steps
3) generate intermediate.pem (intermediate-CA-certificate)
ON YOUR CLIENT, not your server:
openssl genrsa -aes256 -out intermediate-CA.key 4096
openssl req -config openssl.cnf -sha256 -new -utf8 -key intermediate-CA.key -out intermediate-CA.csr
You are about to be asked to enter information that will be incorporated into your certificate request, EXAMPLE:
Country Name (2 letter code) [AU]:US
State or Province Name (full name) [Some-State]:Simpson's State
Locality Name (eg, city) []:Springfield
Organization Name (eg, company) [Internet Widgits Pty Ltd]:FantasyName
Organizational Unit Name (eg, section) []:FantasyName-CA
Common Name (e.g. server FQDN or YOUR name) []:FantasyName-intermediate-CA
Email Address []:address@emailprovider.com

Please enter the following 'extra' attributes
to be sent with your certificate request
A challenge password []:(you can leave this entry blank, just hit [Enter])
An optional company name []:(you can leave this entry blank, just hit [Enter])
important is that you use the same “FantasyName” for 1) “Organization Name” and
“FantasyName-CA” for 2) “Organizational Unit Name” as you used for root-CA.pem,
“challenge password” and “optional company name” doesn’t matter and you can leave it blank
openssl ca -config openssl.cnf -keyfile root-CA.key -cert root-CA.pem -extensions v3_ca -notext -md sha256 -in intermediate-CA.csr -out intermediate-CA.pem
Compare the command output, EXAMPLE:
Using configuration from openssl.cnf
Enter pass phrase for root-CA.key:
Check that the request matches the signature
Signature ok
Certificate Details:
Serial Number: 4096 (0x1000)
Validity
Not Before: Jan  1 11:53:37 2016 GMT
Not After : Dec 31 11:53:37 2016 GMT
Subject:
countryName   = US
stateOrProvinceName   = Simpson's State
organizationName  = FantasyName
organizationalUnitName= FantasyName-CA
commonName= FantasyName-intermediate-CA
emailAddress  = address@emailprovider.com
X509v3 extensions:
X509v3 Subject Key Identifier:
[...]
X509v3 Authority Key Identifier:
keyid:[...]

X509v3 Basic Constraints:
CA:TRUE
X509v3 Subject Alternative Name:
your.server.tld
Certificate is to be certified until Dec 31 11:53:37 2016 GMT (365 days)
Sign the certificate? [y/n]:y


1 out of 1 certificate requests certified, commit? [y/n]y
Write out database with 1 new entries
Data Base Updated
4) generate your.server.tld.pem (server-certificate)
ON YOUR CLIENT, not your server:
openssl genrsa -aes256 -out your.server.tld.key 4096
openssl req -config openssl.cnf -sha256 -new -utf8 -key your.server.tld.key -out your.server.tld.csr
You are about to be asked to enter information that will be incorporated into your certificate request, EXAMPLE:
Country Name (2 letter code) [AU]:US
State or Province Name (full name) [Some-State]:Simpson's State
Locality Name (eg, city) []:Springfield
Organization Name (eg, company) [Internet Widgits Pty Ltd]:FantasyName
Organizational Unit Name (eg, section) []:FantasyName-CA
Common Name (e.g. server FQDN or YOUR name) []:your.server.tld
Email Address []:address@emailprovider.com

Please enter the following 'extra' attributes
to be sent with your certificate request
A challenge password []:(you can leave this entry blank, just hit [Enter])
An optional company name []:(you can leave this entry blank, just hit [Enter])
important is that you use the same “FantasyName” for 1) “Organization Name” and
“FantasyName-CA” for 2) “Organizational Unit Name” as for root-CA.pem,
TAKE CARE that the “Common Name”/FQDN hast to be your exact server address (example: yourserver.ddns.net) here,
“challenge password” and “optional company name” doesn’t matter and you can leave it blank
now create the final server-certificate and remove the password from the pem-file via:
openssl ca -config openssl.cnf -keyfile intermediate-CA.key -cert intermediate-CA.pem -notext -md sha256 -in your.server.tld.csr -out your.server.tld.pem
(the original command in my source for this tutorial is
openssl ca -config openssl.cnf -keyfile intermediate.key -cert intermediate.pem -extensions v3_ca -notext -md sha256 -in your.server.tld.csr -out your.server.tld.pem
but “-extensions v3_ca” causes problems with Firefox browser)
mv your.server.tld.key your.server.tld.key_org
openssl rsa -in your.server.tld.key_org -out your.server.tld.key
create the certificate chain:
cat your.server.tld.pem intermediate-CA.pem root-CA.pem > your.server.tld.cert-chain.pem
5) adjust Nginx settings and provide certificate chain for Nginx
ON YOUR SERVER:
sudo mkdir /etc/nginx/ssl/
Attention: the following command dhparam can take several hours to finish so better use a terminal via screen when you connected via SSH (otherwise you have to keep your terminal running for several hours). You start generating dhparam.pem via:
sudo openssl dhparam -out /etc/nginx/ssl/dhparam.pem 4096
Transfer the certificate data FROM YOUR CLIENT to the home directory of YourServerUsername with scp:
cd /home/yourUser/myCA/
With standard SSH port and without PublickKeyAuth (most common way):
scp your.server.tld.cert-chain.pem YourServerUsername@YourServerIP:your.server.tld.cert-chain.pem
scp your.server.tld.key YourServerUsername@YourServerIP:your.server.tld.key
With custom SSH port and PublicKeyAuth:
scp -P ServerSSHPort -i /path/to/YourPrivateSSHKey your.server.tld.cert-chain.pem YourServerUsername@YourServerIP:your.server.tld.cert-chain.pem
scp -P ServerSSHPort -i /path/to/YourPrivateSSHKey your.server.tld.key YourServerUsername@YourServerIP:your.server.tld.key
ON YOUR SERVER stop seafile and nginx:
sudo service seafile stop
sudo service nginx stop
ON YOUR SERVER edit /etc/nginx/sites-available/your.nginx.config and adjust (or if missing add) the following lines:
ssl_certificate /etc/nginx/ssl/your.server.tld.cert-chain.pem;  # path to your certificate chain.pem
ssl_certificate_key /etc/nginx/ssl/your.server.tld.key;# path to the private.key of your server certificate
ssl_prefer_server_ciphers on;
ssl_protocols TLSv1 TLSv1.1 TLSv1.2;
ssl_ciphers 'EECDH+AES:EDH+AES:!aNULL:!eNULL:!LOW:!3DES:!MD5:!EXP:!PSK:!DSS:!RC4:!SEED:!IDEA:!ECDSA';
ssl_dhparam /etc/nginx/ssl/dhparam.pem;
Cipher settings provided by the article are as recommended in Applied Crypto Hardening.
ON YOUR SERVER:
sudo cp /home/YourServerUsername/your.server.tld.cert-chain.pem /etc/nginx/ssl/
sudo cp /home/YourServerUsername/your.server.tld.key /etc/nginx/ssl/
sudo chown root:root /etc/nginx/ssl/your.server.tld.cert-chain.pem
sudo chown root:root /etc/nginx/ssl/your.server.tld.key
sudo chmod 400 /etc/nginx/ssl/your.server.tld.cert-chain.pem
sudo chmod 400 /etc/nginx/ssl/your.server.tld.key
sudo service nginx start
If you set up Seafile with Tutorial for Seafile CE + Nginx + dynamic DNS (on ARM / Cubietruck / RaspberryPi)) go back there and finish the Seafile server setup completely.
Last steps
When you finished set up your Seafile server go on with the following steps:
When you connect to your Seafile server for the first time your browser will alert you that your Seafile server certificate is not signed by an official certificate authority (which is normally a protection for you not to connect to your bank account website for the case it was “hacked” a day ago - in this case the “evil hacker” would change the certificate to read your encrypted login data while you try to login). Now you can tell your browser to add an exception for your Seafile server website because you know it is yours. Your browser should provide you some kind of info button to examine the certificate (properties/more information or something like this) and you should compare the fingerprint of the certificate the Seafile website (or your Seafile client) shows with the fingerprint of the key chain file on your client computer. If both match you know that the key of the server is really the one you created before.
To show the fingerprint of your server certificate chain use the following the command on your client:
openssl x509 -noout -fingerprint -sha1 -in /path/to/your/your.server.tld.cert-chain.pem
We did all this complicated stuff to provide your Seafile client a secure certificate chain. For this your Seafile client needs the root certificate to verify the certificate chain so you have to add the root certificate on every client system that wants to access your Seafile server via Seafile client (website access will work anyway). To add your root certificate (which is the created root-CA.pem on your client) to the list of trusted root certificates of your client do the following commands on your client. The first command creates a copy of root-CA.pem that you (and other people who want to use your server) can identify better - so something like myseafile.ddns.net-root-CA.crt:
cp root-CA.pem your.server.tld-root-CA.crt
sudo cp your.server.tld-root-CA.crt /usr/local/share/ca-certificates/
sudo update-ca-certificates
Again: reasons for and problems of a full certificate chain!
You have to import your.server.tld-root-CA.crt to every client you want to sync with your Seafile server otherwise file synchronisation via Seafile client will not work. Yes, Seafile client offers the option Settings / Advanced / “Do not verify server ertificate in HTTPS syncing” to disable the certificate verification but the goal of a full certificate chain is to enabling a secure certificate verification between client to server.
If you activate “Do not verify server ertificate in HTTPS syncing” this can will a major security problem!
So again: use “Do not verify server ertificate in HTTPS syncing” only for testing (if the file synchronisation works in general) but never for productive use.
The problem of an own full certificate chain is that some people reported that it can be difficult to import your.server.tld-root-CA.crt in Windows and MacOS clients. I only use Linux clients and never had problems but anyway if you have problems with this under Windows or MacOS: “Do not verify server ertificate in HTTPS syncing” is not a solution!
May the geekforce be with ya… 
Sources used for this tutorial:
- http://www.heise.de/ct/ausgabe/2015-23-Den-Webserver-Nginx-fuer-HTTPS-einrichten-2842005.html
- GitHub - pinae/certificate-chain-creator: A Python script which creates certificate chains with a self signed CA
Please:
-
report any bugs in this thread

-
report if it works and if some sentences/comments are confusing (and why).
-
ask all questions in this thread and not via PM (there are no stupid questions for me)