I am having a few issues with the installation and setup of SeaFile, so I have now tried using the Haiwen setup to go through and get this going.
The only issue that I am finding now is that seahub itself won’t start and when looking at the logs I am getting that it is saying that it can’t start.
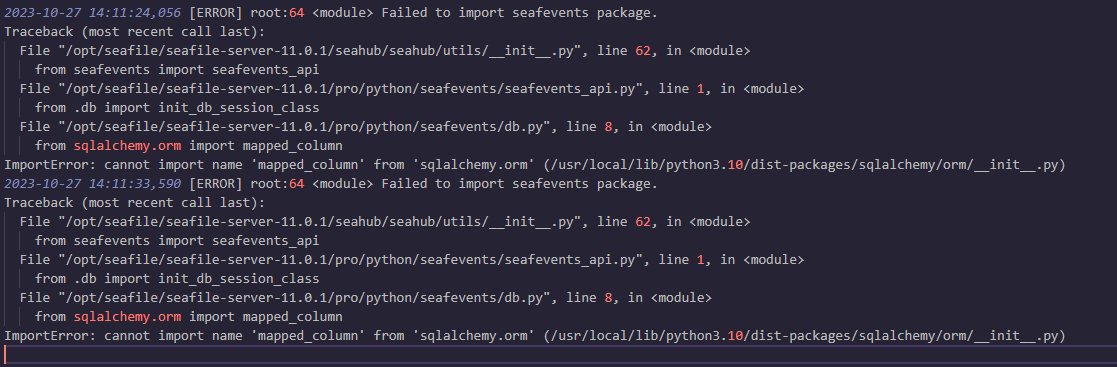
When checking the log file I can see this:
2023-10-23 12:33:48,109 [INFO] seafevents.db:62 create_engine_from_conf [seafevents] database: mysql, name: seahub_db
2023-10-23 12:38:35,416 [INFO] seafevents.db:62 create_engine_from_conf [seafevents] database: mysql, name: seahub_db
2023-10-23 12:40:00,292 [INFO] seafevents.db:62 create_engine_from_conf [seafevents] database: mysql, name: seahub_db
I have gone through and I can’t see any files within the ccnet folder, nor can I see any other DB files, but this folder has been empty through manual installations as well (please let me know if I am looking in the wrong place).
I would be more than happy to share the script used, and/or any other logs that are required (or do a clean-wipe and a manual setup that is going to work!).
I am currently in the mix between this and FileCloud and due to not being able to get this going I am tempted to go ahead with FileCloud (the main reason for these 2 options are the native support for mapping the drives directly to the machines themselves).
type “sudo su root” (if you don’t have root setup yet then do sudo passwd root and set one)
Once logged into root please type “cd /root”
(Anything from here are just going to be commands)
wget RAW GITHUB SCRIPT (I am unable to put links here)
(you will need to replace the " (.) " with just a “.” for the link to work
bash seafile-11.0_ubuntu 11.0.1
The script works by generating a username/password and if you have pre-existing services or have already run the script once, you will either have to re-build your Ubuntu Instance or see below.
wget ### (Get download link by right clicking on the download that you would like from the downloads page)
tar xf seafile-server-###.tar.gz
cd sealfile-server-###
./setup-seafile-mysql.sh
Use the following details:
Server Name: (What you want your server to be called
Server IP or Domain: {SERVER IP ADDRESS}
Server Port: {LEAVE AS DEFAULT (BLANK)}
MySQL Server Host: {SERVER IP ADDRESS}
MySQL Server Port: {LEAVE BLANK} (Unless you have changed this)
MySQL Root Password:
6.1. If you have already run the script, please find this in your /root folder under .my.cnf
6.2. If you have an existing service, please use the previously set password
MySQL User: Leave Blank (Default: Seafile)
MySQL Password for Seafile User:
8.1. If you have run the script, you can find this in /opt/seafile.my.cnf
8.2. If you haven’t run the script, please type your desired password
Database Name: Leave Blank
Seafile Database Name: Leave Blank
Seahub Database Name: Leave Blank
cd /opt/seafile/conf
nano seahub_settings.py
change the SERVICE_URL to be your IP address with “:8000” on the end (i.e. 1.2.3.4:8000/
Ctrl + X, Enter, Y, Enter
nano gunicorn.conf.py
Change the BIND to “0.0.0.0:8000”
cd /opt/seafile/seafile-server-latest
./seafile.sh start
./seahub.sh start
After this, all you will need to do is open a Web Browser and then go to the IP address of your server to access the admin panel.
If you have any further questions, please feel free to reply or email me on mitchw@kwgroup.uk.
(Please note, I am in no way associated to Seafile - I am just looking to help the community!)
Although, the Github readme states it supports Ubuntu 20.04 and 22.04, it is not truth. The installation script fails with ‘Specify MYSQLCLIENT_CFLAGS and MYSQLCLIENT_LDFLAGS env vars manually’ message, which aborts whole installation.
I’ve been trying to move my seafile9 installation to 11 on new server. Five days have passed and all attempts have failed so far. First, I had tried clean install v11 + seadoc in the docker to test it out and this went smoothly. However, when I tried to enable https things went down very quickly. I had all files referencing http changed to https as described in seafile manual, but I never managed to get it working. Logging or a rather lack of it is a joke. Second, I had tried non-docker install with venv and wasted two days. It keeps complaining about python’s libmysqlclient, which has changed the name to default-libmysqlclient in newer versions. It seems seafile scripts got never updated, or there is no intention to do so. And last, tried installation script, which fails with the above. At least I have not invested as much time in it as I did in previous attempts. It is worth mentioning above were attempts to clean install and not upgrade.
To me it looks like they are forcing people to use docker, but have not documented areas of interest for secure setup.
BTW, the install script has wrong CFFI version (14.0) for python 3.10.12. Switching to 15.1 allowed the script to finish.
According to me repeated create_engine_from_conf log entries suggest SeaHub might be retrying the database connection.
Here is some things you can check=you can cross check your MySQL configuration in Haiwen setup; insure the credentials and database name are correct.
You can corroborate if the seahub db database actually exists in your MySQL garçon. Some setups might bear homemade creation.
Make sure the SeaHub process has the necessary warrants to pierce the database.
I actually sorted this a while back as their was an issue with the script itself; after Dan posted his update about this, I got the new script and then it installed fine
Been on it a few months now and can say that for the customers use case, it is very good - although having a few issues here and there (right now to be fair).